Accessing Safe Mode in Windows 10 at boot time in an easy manner has been one of the most frustrating oversights by Microsoft. Since Windows 10, tapping on ‘F8‘ to enter safe mode no longer works. Many users have had issues with drivers or updates causing Windows 10 to either to be stuck in an infinite loop or appear to be stuck at the blue screen with the spinning circle.
Apparently Microsoft has plenty of solutions if you can actually log on to Windows first, however, none to those who can not access Windows in the first place. Quite often, Microsoft support will suggest to either repair the installation, rollback to a restore point, refresh the installation or reinstall Windows. All of which can potentially cause users to lose data and programs.
The Issue
Oculus drivers were installed on Windows 10, citing that they were compatible with Windows 10. However, after installation Windows would not reboot, always hanging up at the blue boot screen with the famous never ending blue dots in a circle. The thought of reinstalling windows was daunting considering that removing the driver would be a simple manual process if I could get access to Safe Mode. So I refused to succumb to the limitations of Windows 10.
In order to find a solution, I had to dissect what really happens when Windows 10 boots. By default, Windows uses “Fast Startup” which seems to start the boot process before the keyboard drivers are loaded. This makes using the ‘F8‘ method ineffective since Windows is past the point of accepting keyboard input during boot time. After understanding how fast start-up works, I was able to break down a working solution to access safe mode once again.
The Solution
Before we begin, you will need an installation disk, USB or some kind of media that allows you to boot into Windows 10 Pre-Installation Environment. Make sure that your PC BIOS has this the installation media boot order is before the drive that Windows is installed. This process will vary depending on what the motherboard inside their BIOS. Once this is achieved, the following process will allow you to enter Windows 10 Safe Mode as we did in previous Windows version:
NOTE: As of Windows 10 Build 1803 (April 2018 Update), the Installation media will no longer allow access to administration credentials on the hard drive. In this case, allow the computer to fail several times until it finally boots up in Automatic Repair Mode. After this, proceed to step #2.
- Boot up the installation media and wait for the menu.
- We will need to enter the Command Prompt, to do this without navigating through options, we can simply use ‘Shift-F10‘.
- Once at the command prompt, you will need to find your way to the C:\Windows\System32 directory of where windows is located. Note: if you have multiple hard drives, your Windows 10 installation may be on a different drive such as D: or E:.
- One you have done this, we are going to tell Windows to boot up without using “Fast Startup”. To achieve this type:
bcdedit /set {default} bootmenupolicy legacyand hit the enter key. - Close the Command Prompt, and remove the installation media.
- Reboot the PC.
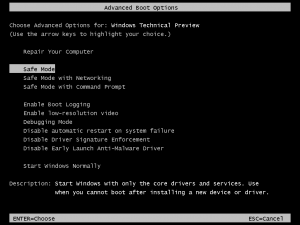
- Now you should be able to enter the Advanced Boot Menu by repeatedly tapping the ‘F8′ key. You should see something like this below:

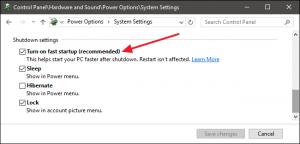
We can not boot into Safe Mode or whatever mode you desire! Make your desired fixes while in Safe Mode. When you have fixed Windows 10 to where it is back in working condition in Normal Mode, you can turn “Fast Startup” back on by entering the command prompt, and typing in: bcdedit /set {default} bootmenupolicy Standard or use the Control Panel under Hardware and Sound\Power Options\System Settings as shown below.

I hope this guide helped you save a lot of time and undue stress while troubleshoot Windows boot problems! If you need to uninstall drivers and software from Windows 10, please refer to the guide: Uninstalling Programs in Windows 10 Safe Mode


